
In the mass production of glass containers within factories, container-related issues can sometimes arise on the production line. The effects of damage to the container may not be evident until laboratory tests, such as inspections for hydrostatic pressure resistance, are conducted, or until the containers reach the customer and reports are received that they do not withstand handling, breaking in their lines during filling, packaging, or stacking.
This becomes a headache for glass container manufacturing plants or for customers using the containers for their products, leading to a lack of trust in the product.
To address this, it is crucial to establish a robust process in the production line where there is a strong commitment from Maintenance, Production, and Quality, each playing its role to prevent such problems.
Maintenance: Focus on prevention by implementing maintenance programs that consider the working time of anything that comes into contact with the container to avoid metal-glass contact.
Production: Be mindful that anything in contact with the container has proper protection, is not worn out, or has not broken or fallen.
Quality: Conduct continuous tests and inspections on the container to guarantee its quality and anticipate potential problems. Obtain information from each test to establish frequencies where patterns leading to container breakage can be observed.
It is essential to have routines shift by shift to record all information, providing evidence of analysis and the implementation of corrective actions to continually improve the process and minimize potential problems.
The record should be in two parts: one for shift-to-shift routines on moving parts that come into contact with metal and glass, and the other for routines involving static parts in contact with the container. The latter routine can be more open, conducted once per day.
Quality should conduct inspections for hydrostatic pressure resistance with well-established routines. In case containers do not meet specifications, perform a comprehensive analysis considering:
- Machine Forming Number
- Mold Number that broke
- Section/Cavity to which the container belongs
- Tape bottles from the same mold to observe:
- Height at which the container broke
- Pattern of breakage
The result of the analysis can be presented in two ways:
- The container has a problem.
- The damage was caused during the process.
Containers undergoing hydrostatic pressure resistance testing should first be inspected for visible buckling, which can be observed under good lighting conditions (using a 1000-lumen lamp).
In the analysis, it’s important to determine if buckling occurred in the hot area (container exit from the mold, sweepers, conveyor to the transfer, entry to the annealing oven).
If no buckling is found in the container or if there is no repeated mold number and section/cavity, it may indicate an inconsistency in the behavior of containers not meeting hydrostatic pressure resistance specifications. In such cases, an analysis of the annealing oven should be considered to determine if a specific zone is causing the container issue (which is the focus of this article).
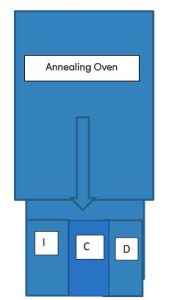
To conduct this analysis, divide the annealing oven lengthwise (see Figure 1), take four consecutive containers, marking each one’s position as right side, center of the oven, and left side. Perform hydrostatic pressure resistance inspections on these containers and subsequently process the data for analysis.
The Arrow indicates the flow of the container.
The “I” indicates the container that will be taken and identified, which was taken from the left side of the annealing oven.
The “C” indicates the container that will be taken and identified, which was taken from the center of the annealing oven.
The “D” indicates the container that will be taken and identified, which was taken from the right side of the annealing oven..
The analysis will involve determining the average for each block of data classified according to each container’s location (Left side of the annealing oven, Center of the oven, Right side of the annealing oven).
You will find that one of the three has a lower average than the others, and by examining the individual values, you can see that it’s the same molds that are present on all three sides but exhibit different behaviors. This is indicative of an issue with the annealing oven, so efforts should be focused on addressing temperature compensation or a problem with the oven’s mesh.
Based on the information obtained, an analysis of the temperatures in the annealing oven needs to be conducted to demonstrate the following:
- Ensure uniform heat flow in the oven. If not, verify that the fans in each zone are operational and that the motors driving the heat flows have the same rotation direction.
- Check for heat loss at the annealing oven joints or any areas where the insulation may be damaged.
- Confirm that the burners are operational and undamaged.
- Verify that the temperature controller indicator shows similar temperatures on the Left and Right sides, with a maximum difference of 5°C, and that the setpoint is similar for each side.
Once the cause is identified:
It’s always crucial to maintain reliable records in each department because they are key to making process improvements and working on quality management.
During meetings, the presence of Maintenance, Production, and Quality with their respective records is vital for conducting joint analysis and making necessary adjustments to achieve process improvement and minimize issues.
Recording the required changes in the documents is essential to prevent the problem from recurring and to ensure that corrective actions are implemented effectively.
Ing. Andrés De la Rosa
Want to know details?
Find us at: www.rovisa.com.mx